Art, Alive! (the making of audiobook.gallery [part 3])
By Sam Lowe
Partner, recycleReality
February 21, 2024
6 min read
It’s been a long journey through the making of audiobook.gallery here on the blog, but we have made it to our final topic: the visuals! I’d like to extend a big thank you to those who have been following along, and for anyone just jumping in - you might want to take a look back at parts 1 and 2, where we went over our processes for bringing VR to web and building our audio-reactivity pipeline.
In this concluding post, we will be going deep on the visual effects powering the 13 listening rooms in the gallery. There are two basic building blocks for all of the effects, namely textures and objects. We’ll jump in first with the textures, which were designed using Unity’s Shader Graphs.
Textures
There are many different approaches to modeling material textures in Unity. One approach is based on shaders - short programs that can be used to calculate color and 3D displacement at a pixel-by-pixel level, allowing for easy parallelization and fast performance. Unity includes a node-based shader builder in several of its rendering pipelines called Shader Graphs. Developing shaders this way allows for incremental evaluation and a compositional, rather than all-or-nothing, approach.
Each room in audiobook.gallery consists of two main shader types and three shaders in total. Behind each painting is a growing, animated mesh I’ll refer to here as a parametric projection. In addition, there is a foreground effect of camera-tracked, floating elements I’ll term flying fragments. In this section, we’ll go over the basic principles informing the design of each, as well as a specific example.
Textures: Parametric Projections
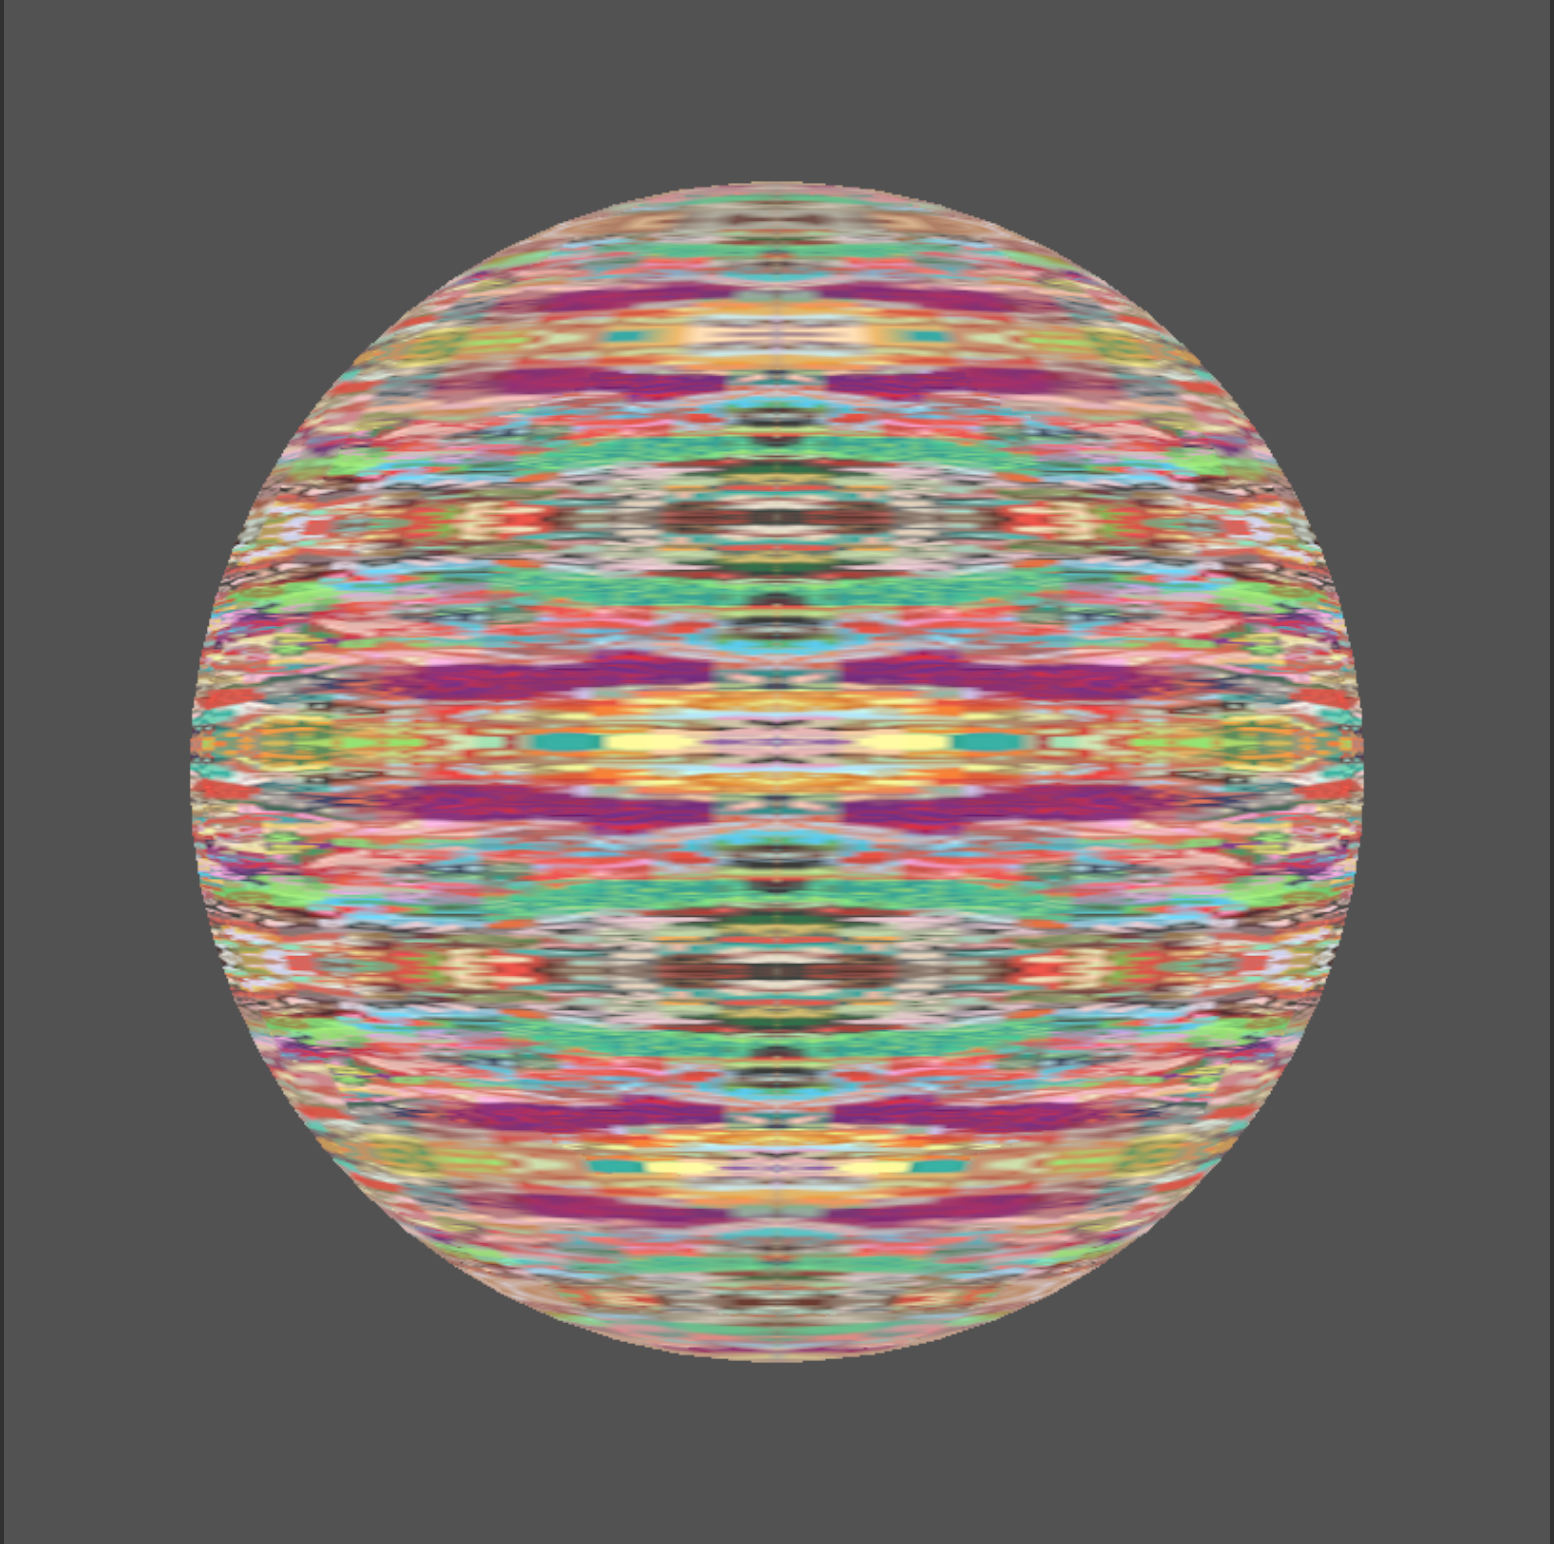
The parametric projections were probably the most creatively “free” out of all the design decisions that went into the final product. Once I had established a basic framework for how the shaders would function, the process to arrive at the final 26 was simple experimentation.
At a high-level, Shader Graphs consist of a vertex shader governing two or three-dimensional positions and a fragment shader that controls colors. While I’m sure that at least some of the manipulations we’ll discuss in the objects section could have been achieved as a part of the vertex shader, we focused exclusively on using Shader Graphs to animate the art pieces in compelling ways, so we will only be looking at the fragment shader here.
The essential components for the parametric projection shaders are a timekeeping function (typically oscillating to create looping effects), some sort of UV processing to manipulate the mapping of art-to-texture, and a texture sampler. These can all be seen in the example for parametric projection A below:
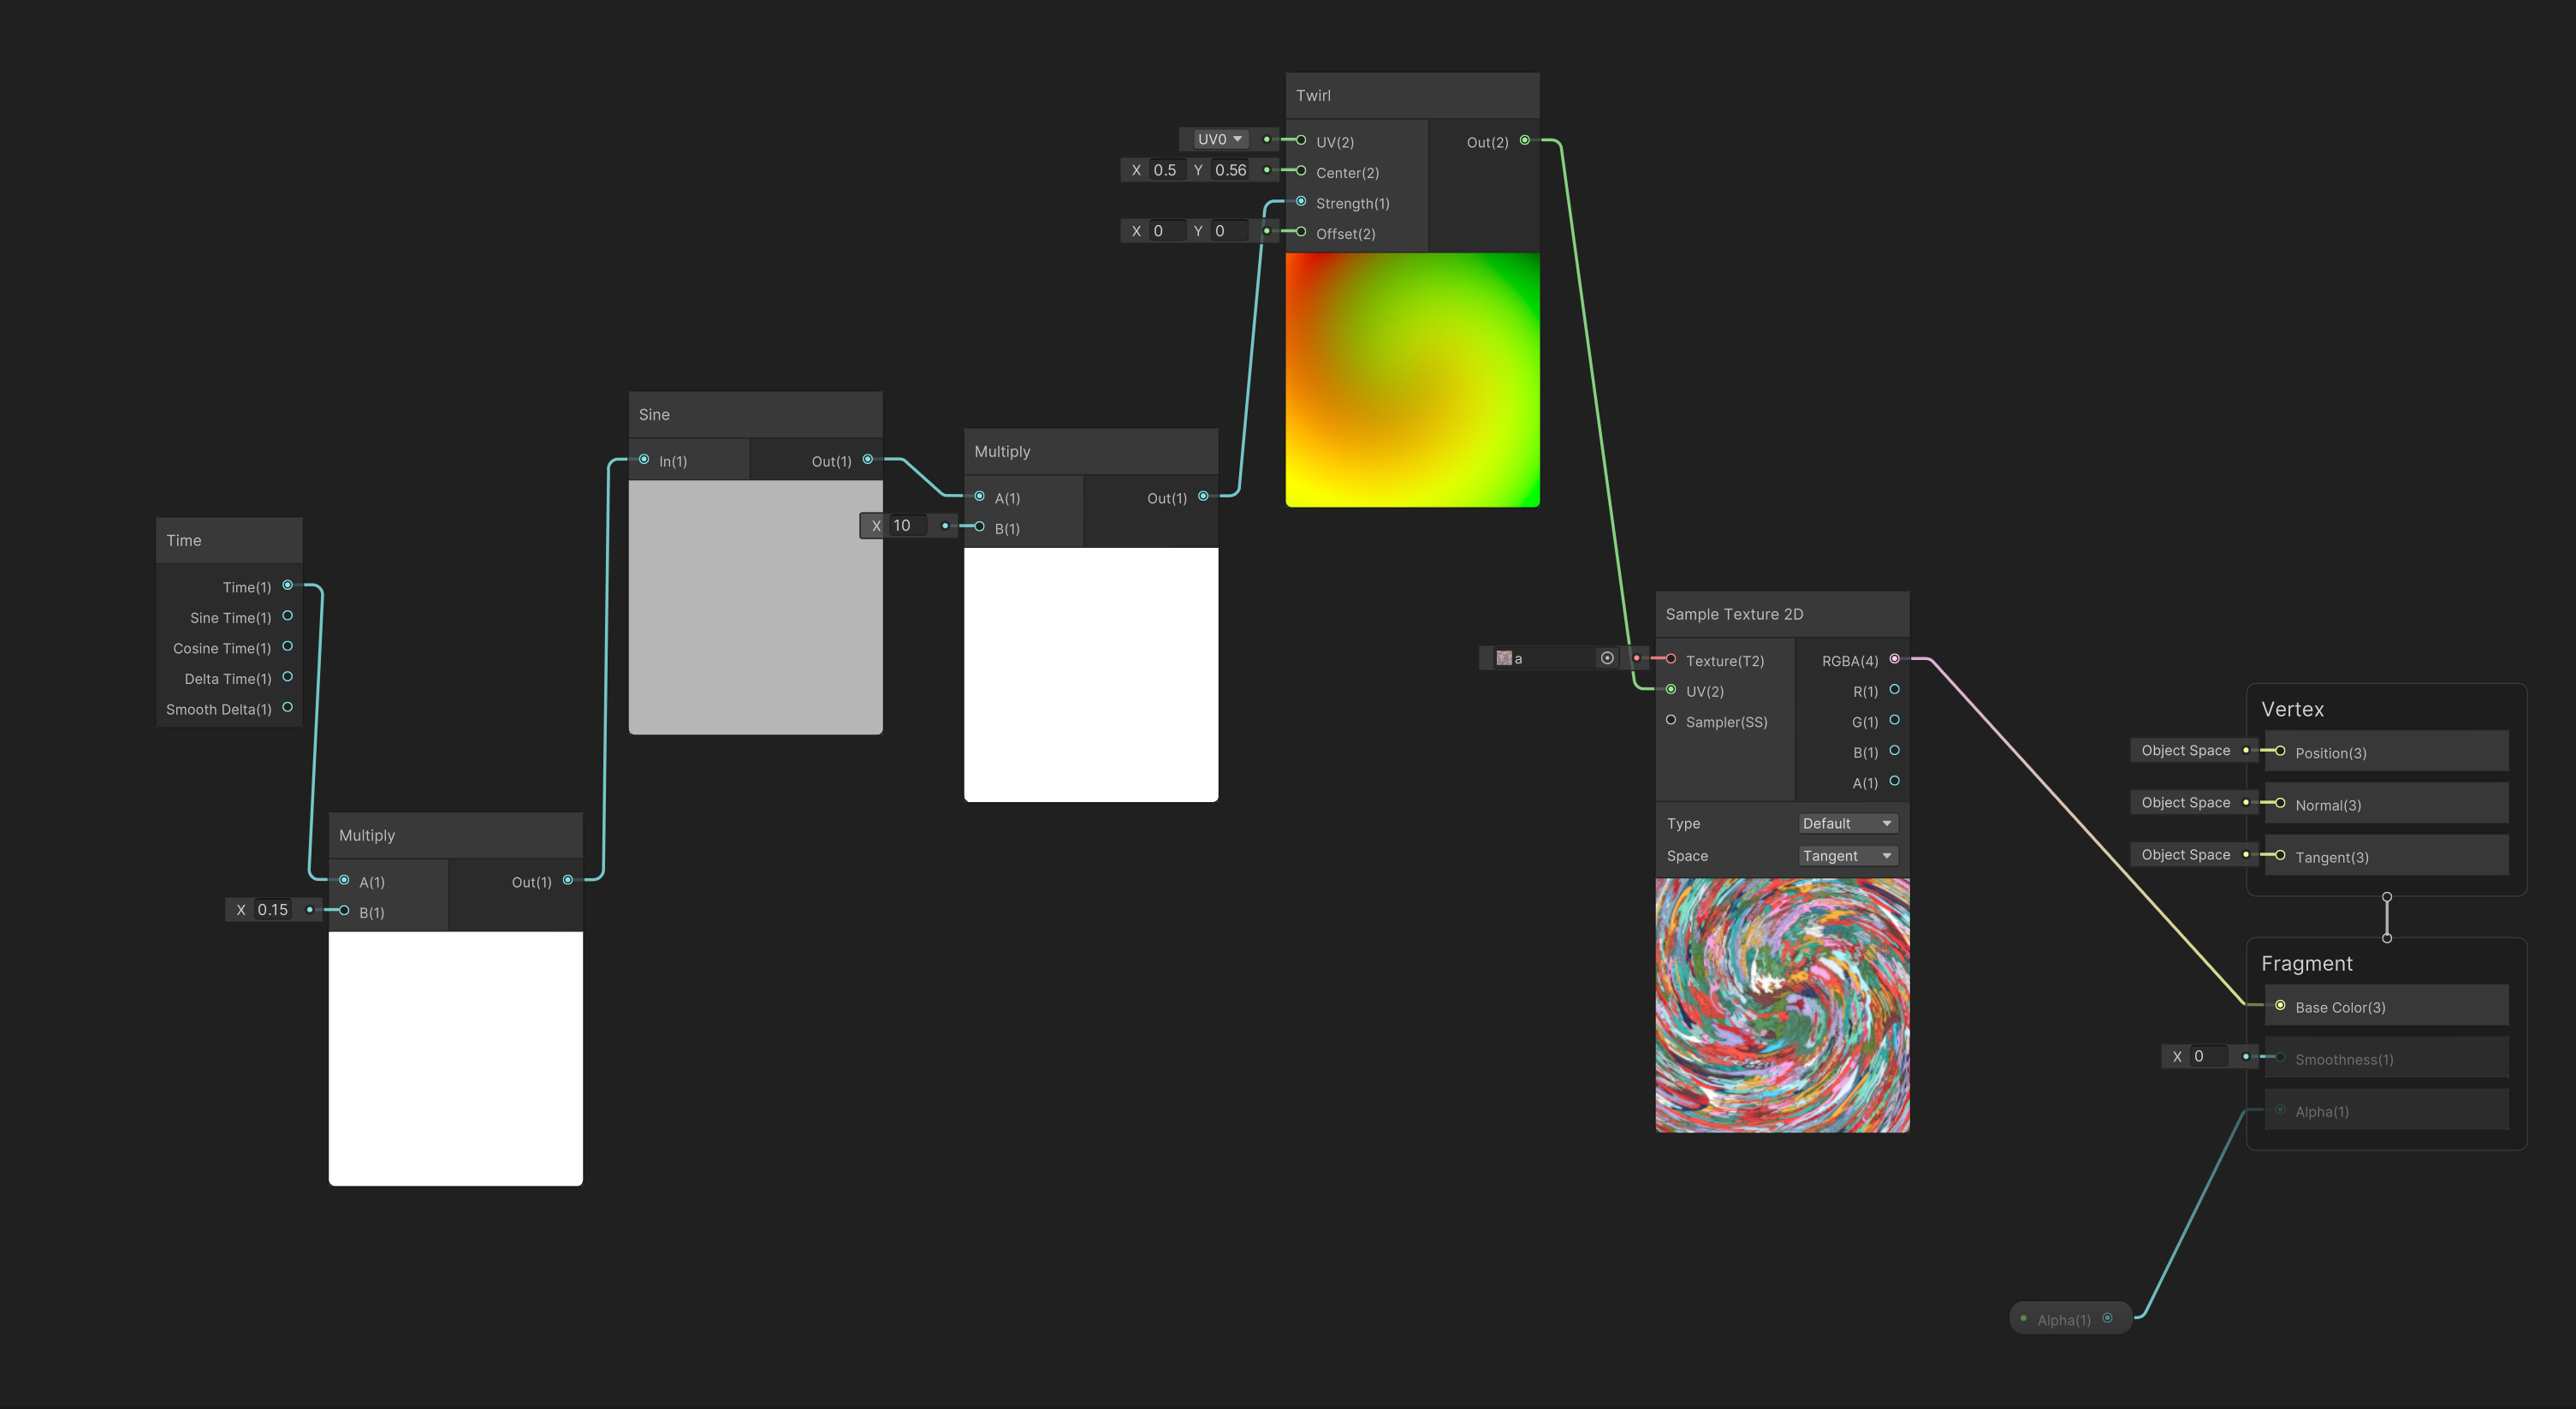
From left to right, this parametric projection consists of a time node that is multiplied by a constant < 1 to slow the oscillations of the next node, a sine function. The sine output is multiplied by a factor > 1 to increase its magnitude and is then used as input to the strength control of a UV “twirl” effect. This is used as the UV map for a texture sampler with painting A as the texture. Finally, this sampler is used as the base color for the fragment shader.
You probably notice the small node labeled Alpha that is grayed out and connected to the Alpha value of the fragment. This shader is opaque, so it does not have a transparency alpha value, but if it did, the small Alpha node would be a controllable parameter for the material in the editor window or via script.
Textures: Flying Fragments
Similarly to the parametric projections, the flying fragment shader graphs are, as the name suggests, solely fragment shaders. Dissimilarly, however, they have a - relatively - fixed structure and required some pre-processing of the original images in Photoshop.
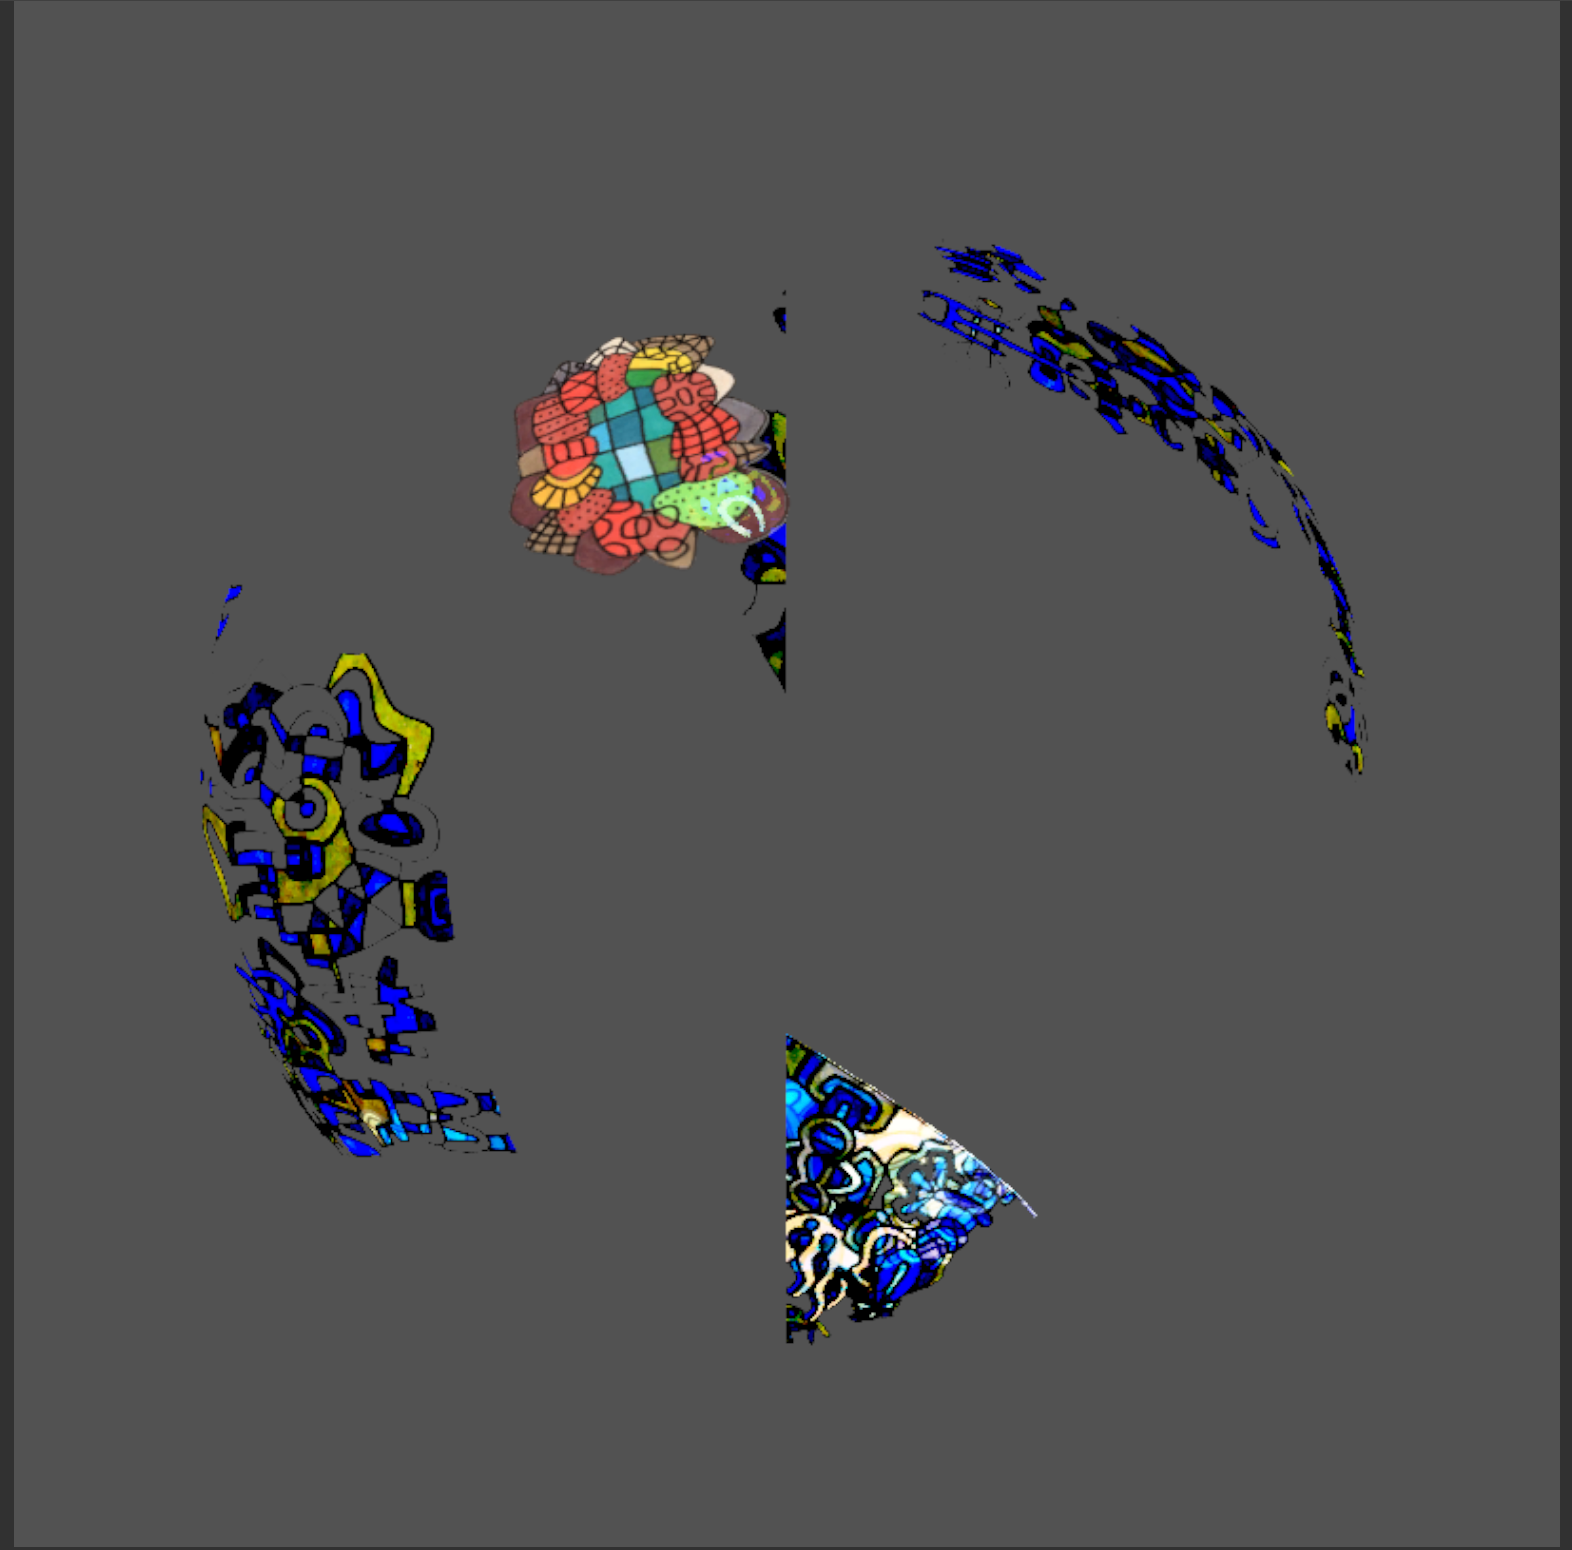
Each flying fragment consists of two or more isolated colors or shapes cut from the source paintings, animated by simple UV transformations borrowed from the parametric projections, and combined with a variety of blend modes.
The flying fragments also represent one of the two main audio-reactive elements controlled by the envelope follower from our last post (the other being audio-linked scaling of the paintings themselves). In this case, the alpha variable we introduced for the parametric projections - but did not utilize - is controlled by the follower sample value.
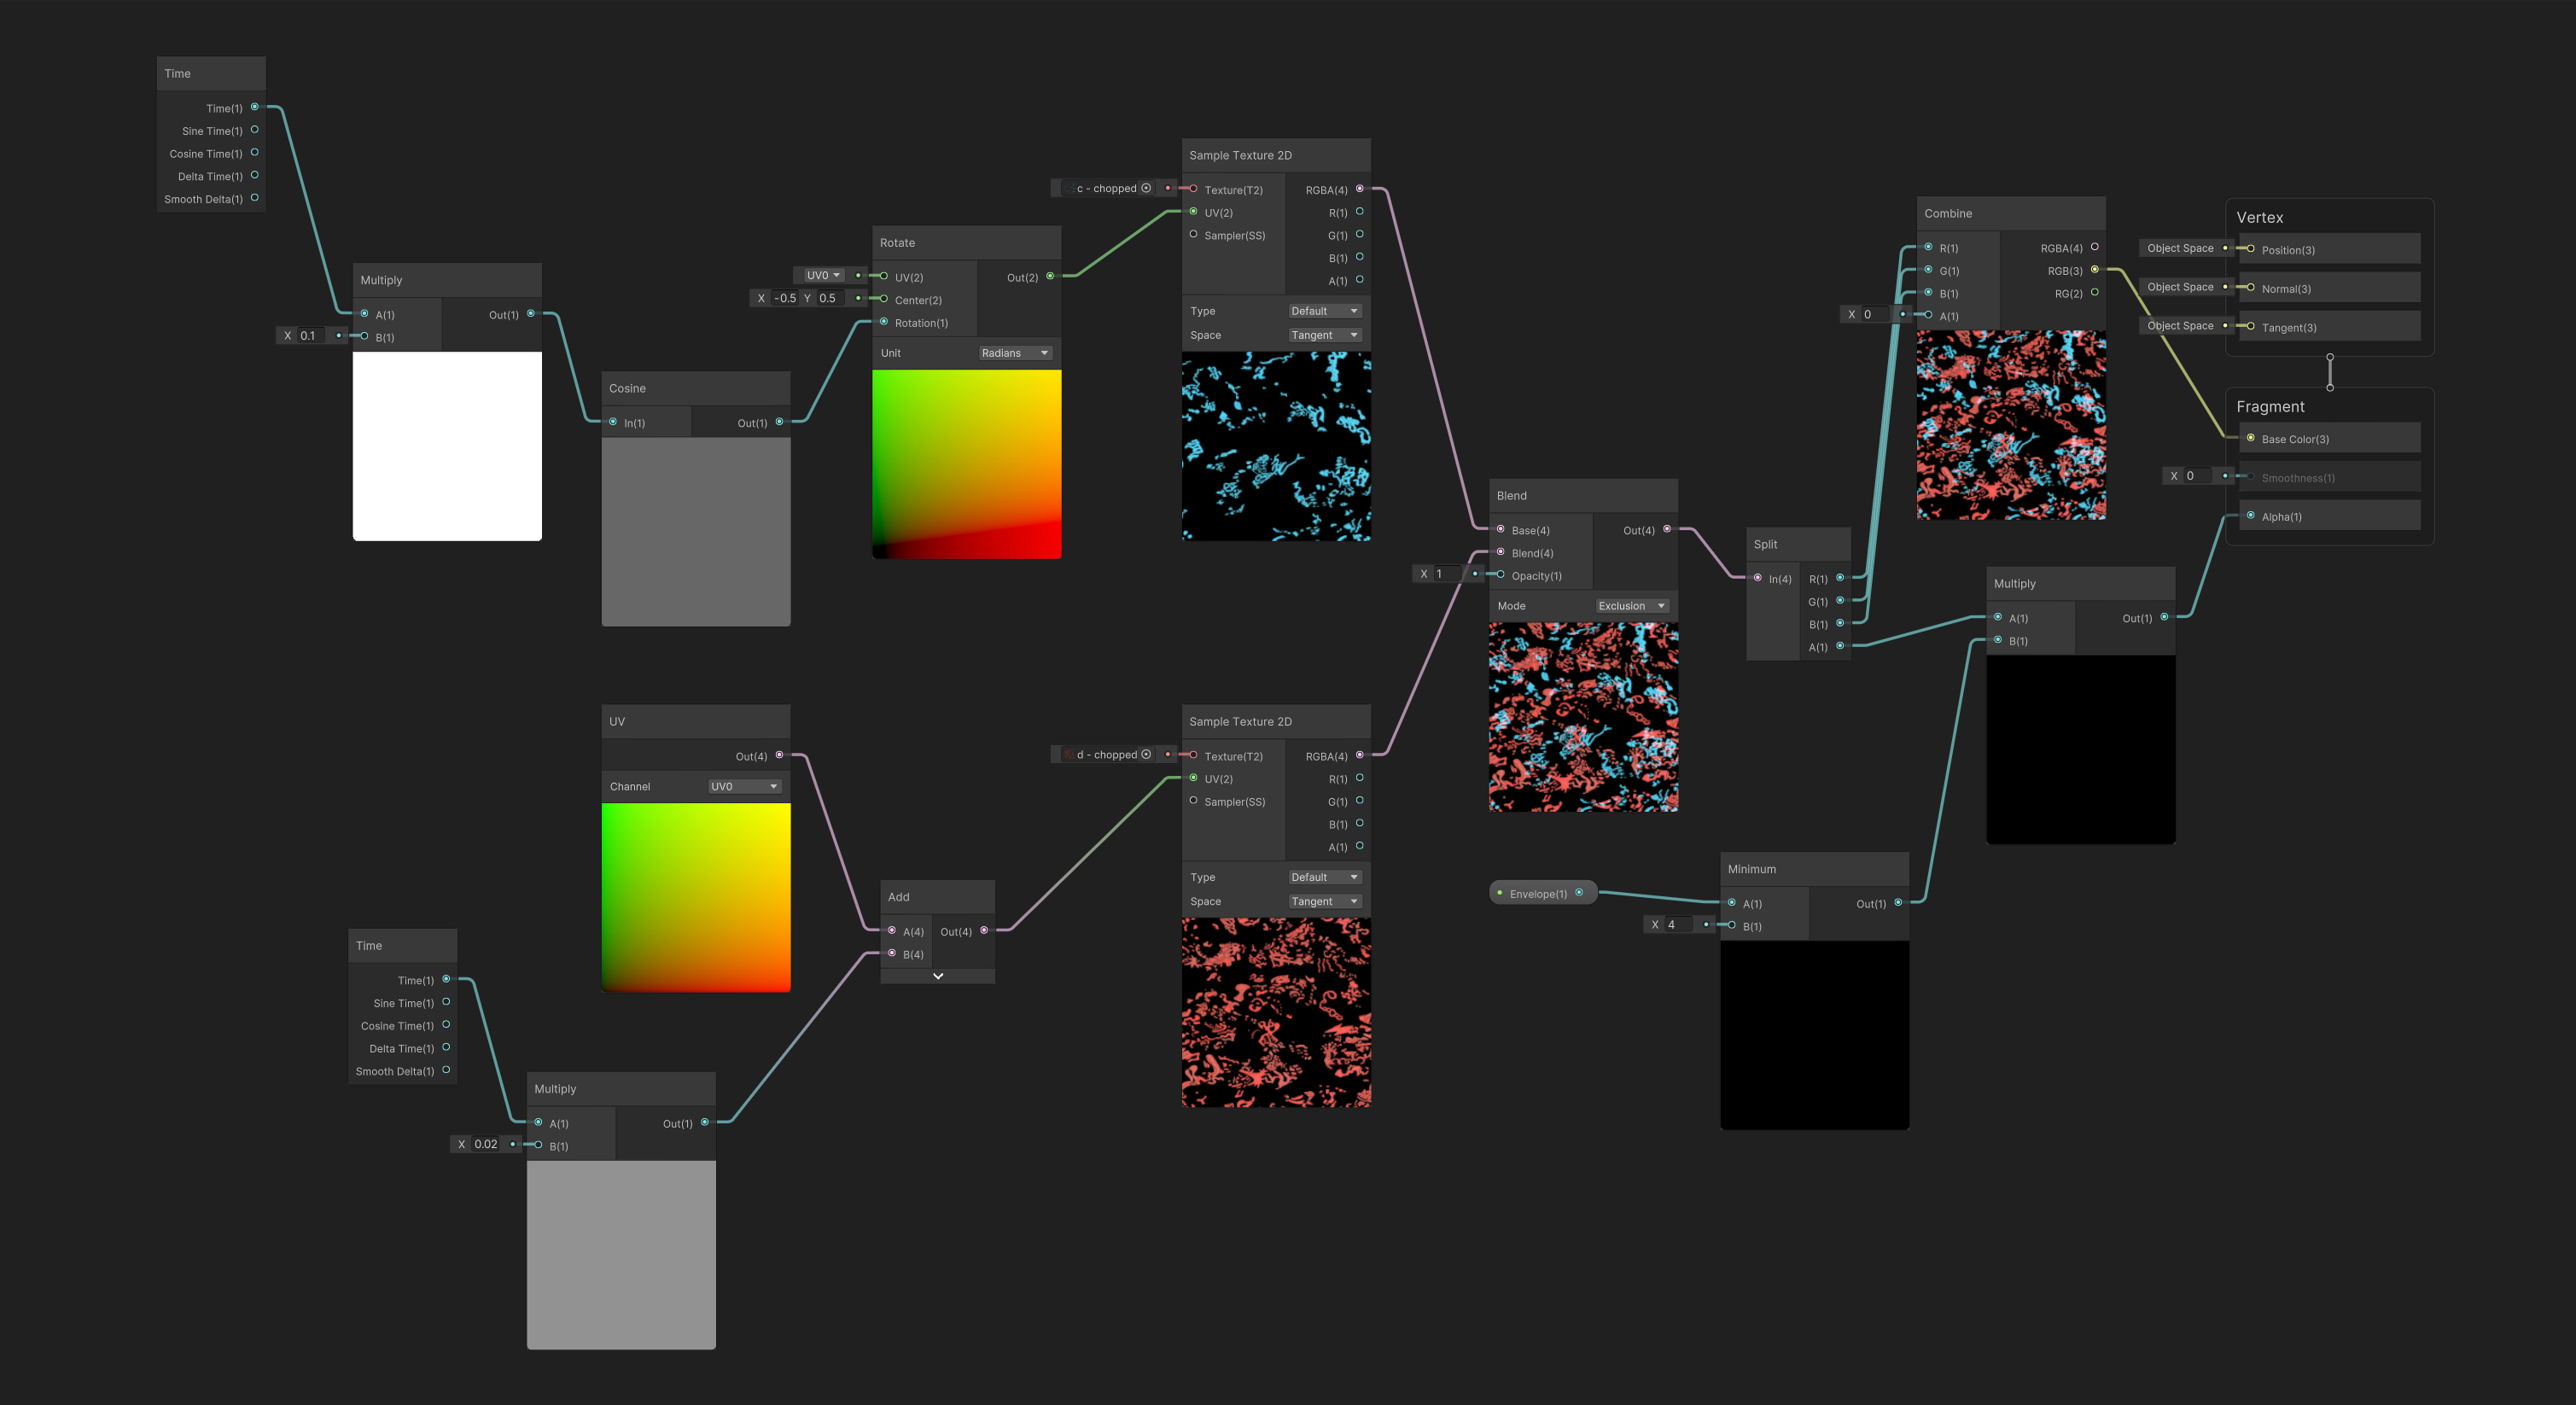
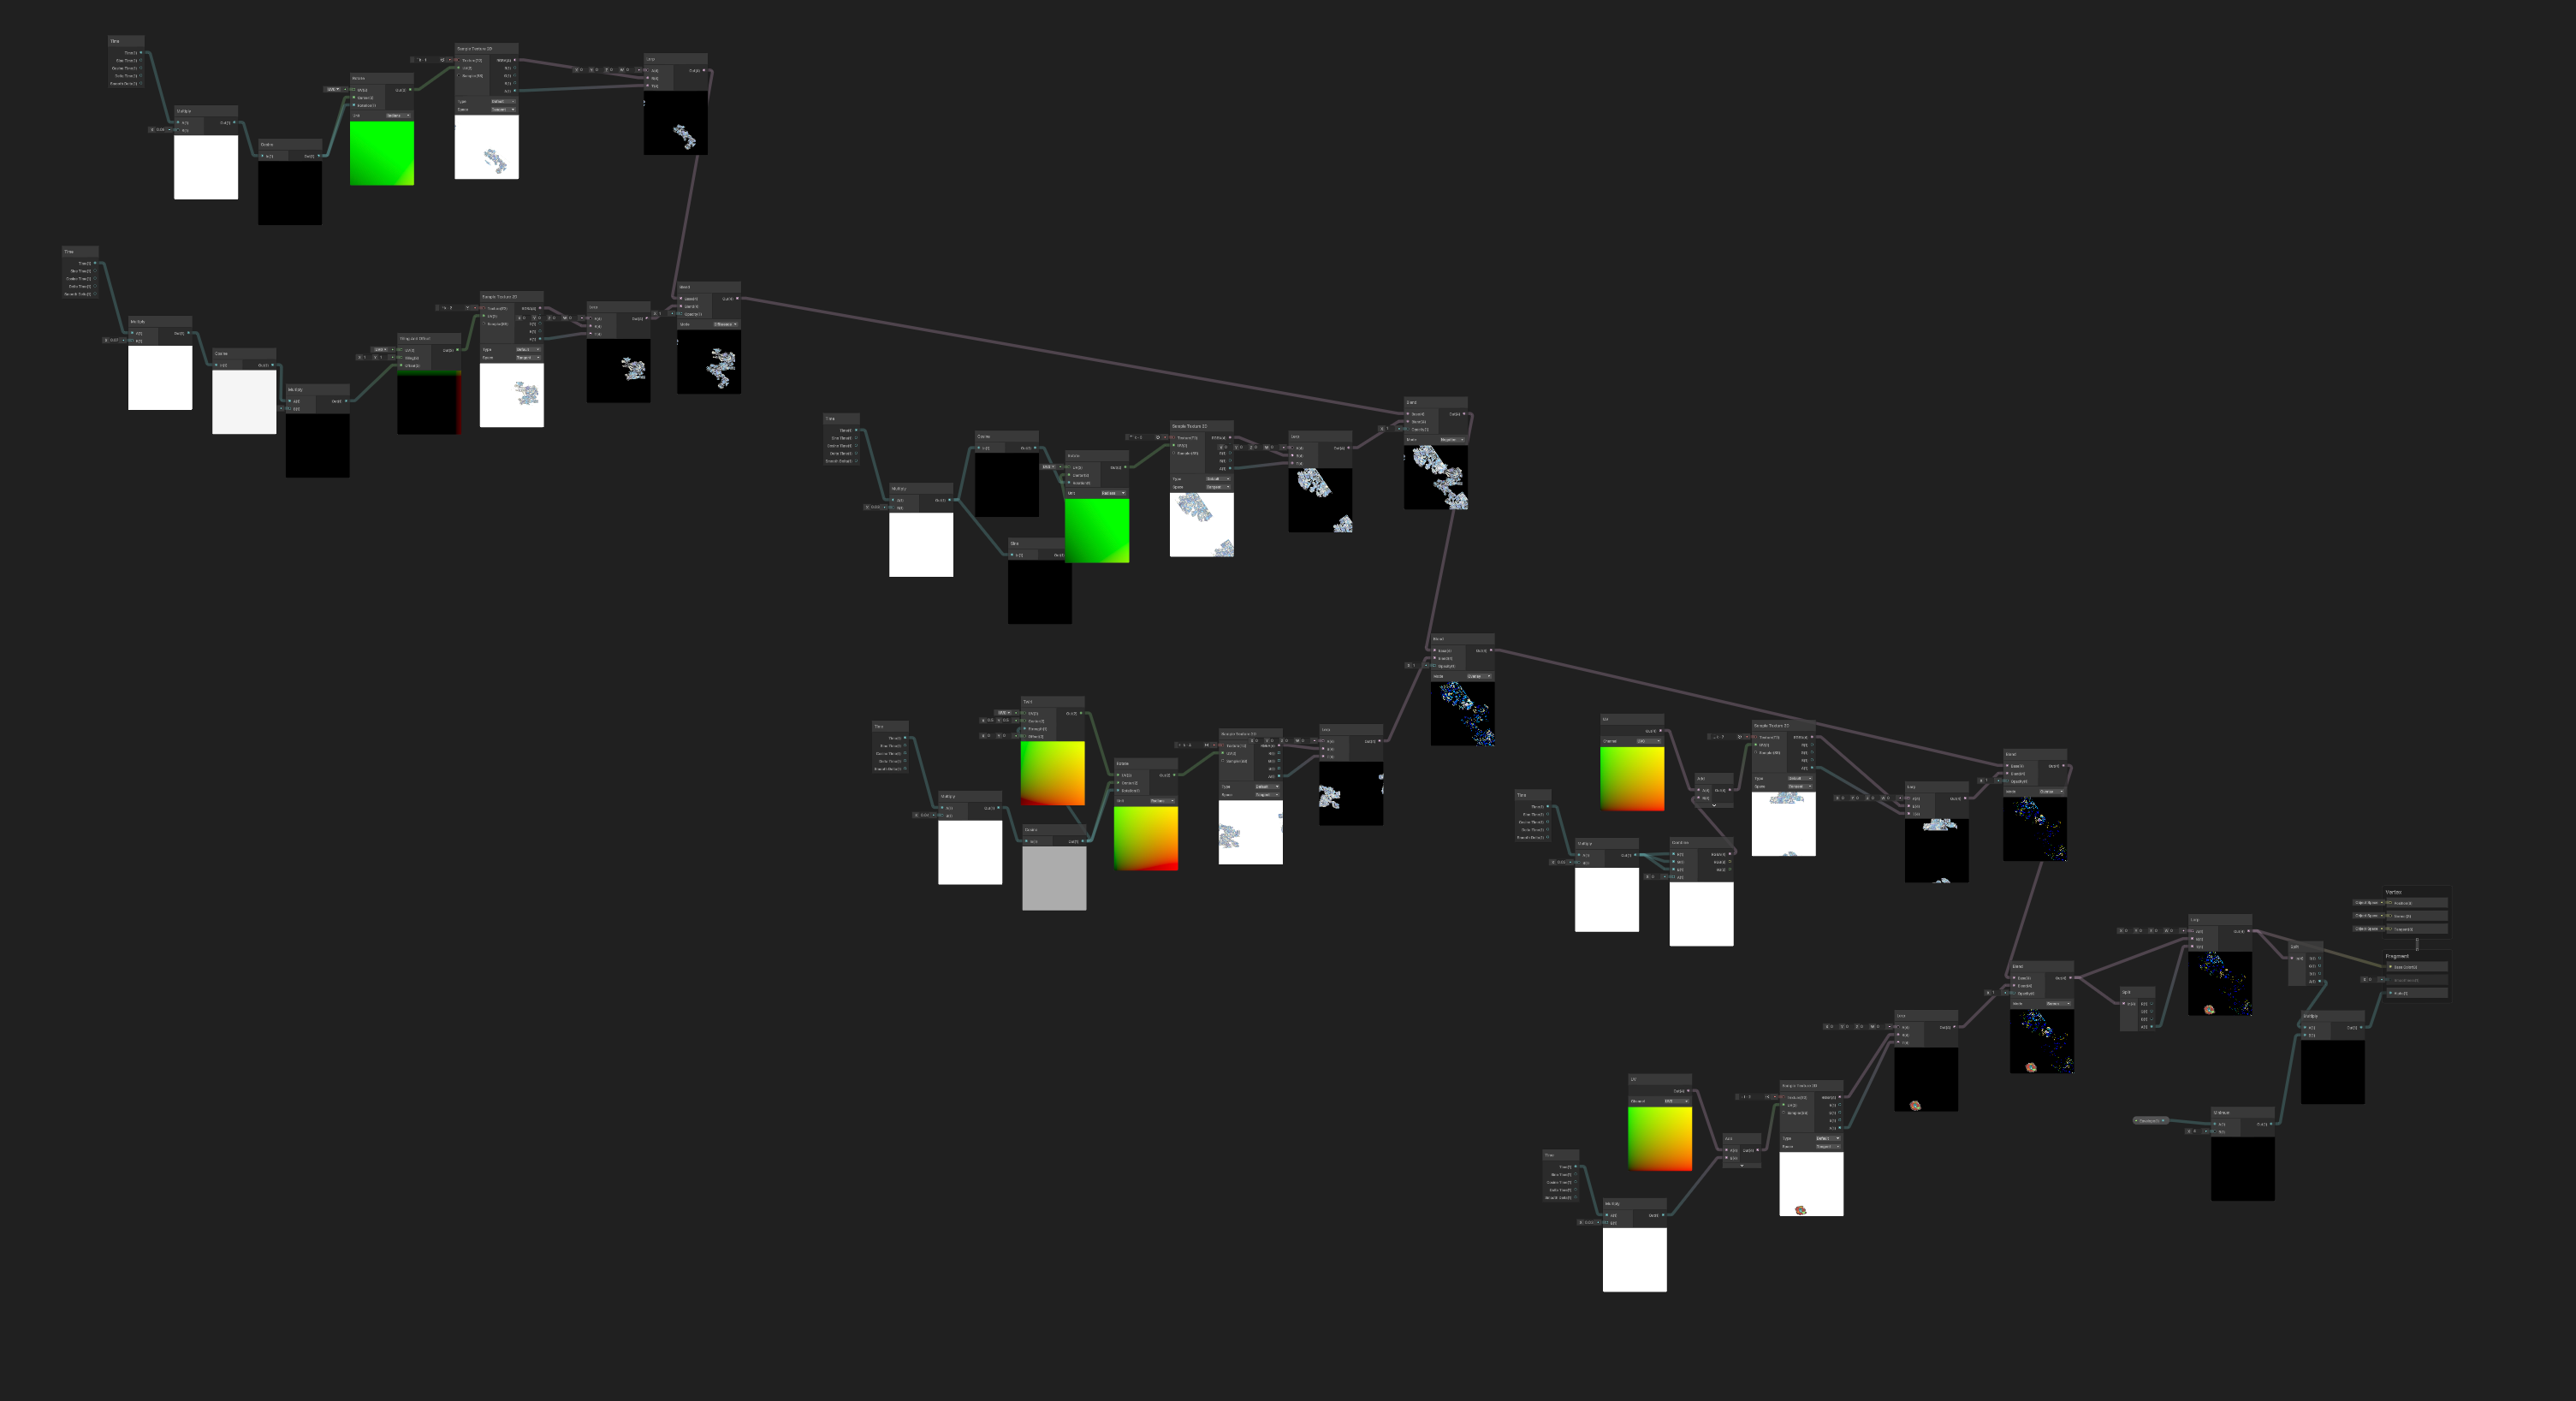
The two main connections into the middle Blend node should be familiar based on the previous shader we looked at. They both consist of a modulated time value animating a UV transformation. The bottom component does not oscillate, however, so the value from the Add node increases monotonically. In this case, the looping effect comes from the default tiling of the texture sampler.
We experimented with a variety of blend modes across the various rooms, though not all led to compelling results (and some required inverting the alpha channel value using Split, Lerp, and Combine nodes). The nodes to the left of the blend are necessary to maintain the existing transparencies in the base textures while using the external variable “Envelope” to fade the fragments in and out alongside the audio.
Objects
One major takeaway from the variety of sound toys I built as a Stanford grad student is that you can go a long way in Unity by scripting complex manipulations of very simple geometries. This insight provided the basis for all of the objects powering the visual effects in audiobook.gallery: in each listening room, our shader graphs were applied to basic half-spheres with scripts controlling their movement and behavior.
Objects: Parametric Projections
The main effect we were trying to achieve with the parametric projections was that of the painting growing out along the walls. After a lot of trial and error, I realized that I could rely on good, old-fashioned geometry. Using the fact that a sphere centered on the origin of the scene consists of all the points at a fixed distance away, I wrote a script that initialized every vertex in the mesh at a point behind the painting and animated it using only rotations from that point.
That script alone would give the effect of a fixed shape dome expanding from the painting (which is utilized in a select number of the rooms), but our final script added random noise and oscillations - among a few other parameters like max rotation - to give the animation additional dynamics.
Objects: Flying Fragments
While the final script controlling the parametric projections was quite complex, the flying fragments were comparatively easier to implement. We wanted our two primary effects to feel as though they were moving along different dimensions to add depth to the experience, so I applied the shaders to a smaller dome centered on the camera, updating each frame to the current camera position. It’s a simple effect with a compelling result.
It’s only fitting that the final post in this fairly long series was itself a long one, but I personally had the most fun with this portion of the development process and wanted to elucidate some of the methods I uncovered along the way. It would have been even longer had I included all the shaders from every room, but if you’re building a Shader Graph-powered Unity experience and want to see more, get in touch!
As a last word of thanks, I want to shout out Harlan Kelly at Psychic Hotline for bringing us on board for this project and for being a great collaborator throughout all the iterations preceding the release - design is always better with friends! Our series on audiobook.gallery may be ending here, but stay tuned on our blog for more tips, tricks, and deep dives on our development and design work and to see what we’re building next.
recycleReality is now Router.
recyclereality.net will remain archived if you'd like to explore our prior brand and portfolio.